Sacramento Cabinet Refacing Anchor is the process of covering existing surfaces with new veneer panels to give them a fresh look. This saves on labor and construction materials while being more eco-friendly than replacing cabinets entirely.
However, it’s important to understand the limitations of this solution. Refacing won’t address structural issues like water damage or rot. It also won’t change your kitchen layout.
Cabinet refacing is a cost-efficient option for homeowners looking to update their kitchen with a fresh look without undergoing a full remodel. In fact, it costs nearly 50% less than replacing cabinets. It’s also an excellent way to increase the resale value of your home. However, it’s important to have a clear understanding of the associated costs and time so that you can prepare accordingly.
The cost of cabinet refacing depends on a variety of factors, including the size of your kitchen and the materials you choose. It’s also important to remember that the project duration will vary depending on how large or complex your renovation is. For example, refacing a larger kitchen with a lot of cabinets will take longer than refacing a smaller kitchen with few cabinets.
It’s important to be aware of all the costs involved in a cabinet refacing project so that you can plan accordingly. This will help you avoid unexpected expenses and lengthy remodeling timelines. Additionally, it’s essential to communicate clearly with your contractor about your budget and desired outcome of the project. This will ensure that everyone is on the same page and minimize any misunderstandings.
Another important factor to consider is the quality of the materials used in your cabinet refacing project. Homeowners should avoid cheaper options that often result in delamination. This is a process in which the glue connecting the laminate to the applied surface loses its adhesiveness. If this happens, your kitchen will not only look unattractive but can also become unsafe for you and your family to use.
If you’re considering a cabinet refacing project, it’s worth taking the time to compare quotes from different companies. This will help you find the best price for your project and make sure that you’re getting the highest-quality materials.
Cabinet refacing projects require less material than replacing cabinets, so they’re an eco-friendly choice. By reusing existing cabinet frameworks, the refacing process reduces landfill waste and helps to conserve natural resources. In addition, by using custom veneers and hardware, homeowners can create a bespoke design that reflects their personal style. This customization makes a significant impact on the overall appearance of the kitchen while enhancing resale value.
Time
Cabinet refacing can be an excellent option for those who want to upgrade their kitchen without the cost of a full remodel or replacement. Unlike cabinet replacement, which involves removing and installing completely new cabinets, refacing utilizes your existing cabinet boxes and merely replaces the fronts. This allows you to achieve a brand-new look for a fraction of the price, while still maintaining structural integrity and minimizing waste.
The costs associated with refacing are typically significantly lower than the cost of replacing cabinets, as much as half. Because the project is less invasive, it also requires far fewer materials. Additionally, the project can be completed much faster than a full replacement. In addition to the savings, refacing gives you more flexibility when it comes to design choices. You can choose from a variety of veneer options to create a unique look, and you can even customize the handles and knobs to your liking.
Another advantage of cabinet refacing is that it doesn’t require any demolition or extensive construction, which can often be disruptive to your home life. The kitchen is typically in the center of your home, and long construction projects can cause a lot of mess and interruption. When you reface your cabinets, however, the framework remains intact, so you can continue using your kitchen as normal.
While refacing can save you time and money, it isn’t the right choice for every situation. It isn’t a good option for those who need to change the layout or have serious damage to the existing structure. It’s important to discuss your options with a professional, and decide if this is the best fit for your kitchen rehab.
Choosing the right contractor is an important step in the process, so make sure to do your homework! Ask for referrals and compare quotes from multiple companies to find the best deal. In addition, be sure to schedule the project at a time that works with your personal and family schedule. That way, you can return to a functional kitchen quickly and enjoy the benefits of your hard work.
Disruption
Cabinet refacing is a popular choice for homeowners who want to give their kitchen a fresh, updated look without the hefty price tag, long project duration and environmental toll of a complete remodel. This less invasive option preserves existing storage locations, keeps walls intact, and reduces the amount of waste that must be disposed of at the end of a renovation. However, it’s important to understand the complexities of this process so that you can choose whether it’s the right choice for your home.
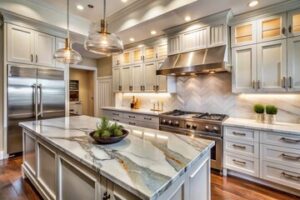
During cabinet refacing, the doors and drawer fronts are removed, carefully measured, cleaned and lightly sanded to prepare them for new veneer. The new veneer is then applied to the surface of the cabinets, and the old hardware is replaced. The result is a modern, refreshed aesthetic that can completely transform the look of a kitchen, bathroom or laundry room.
The durability of refacing depends on a variety of factors, including the quality of materials and the installation process. A quality product will last much longer than an inferior one, but even the best refacing materials need regular maintenance to retain their appearance and functionality. Cabinets that are used on a daily basis will experience more wear and tear than those that are rarely opened, so regular cleaning and regular touch-ups are key to preserving their appearance.
One of the biggest challenges with refacing is ensuring that the new door and drawer fronts match the style and finish of the existing cabinet frames. If not done properly, the mismatch can leave a room looking disjointed and unfinished. This is why it’s so important to work with a professional that can ensure a seamless transition between the old and new.
While refacing is an eco-friendly solution, it’s not as green as replacing old cabinets with new ones. Rather than discarding a large volume of materials, refacing uses wood veneers that are sourced from sustainable forests. This method also significantly cuts the use of resources, compared to the raw materials needed for a full replacement. However, if the existing cabinets have irreparable damage or structural issues, it’s probably more cost-effective and environmentally friendly to replace them entirely.
Options
Cabinet refacing offers the opportunity to refresh your kitchen without the full-blown remodeling that’s required for a total replacement. The process involves covering the front of your cabinet boxes with a veneer or laminate material and installing new drawer and cabinet door fronts. New knobs, handles and pulls can also be installed to enhance the overall look of your space.
Typically, cabinet refacing is completed in a few days and the kitchen can still be used during this time. The installation process requires precision, skill and experience. A professional will be able to complete the project much quicker than a homeowner who attempts the work on their own. In addition to the time savings, a professional will ensure that the job is done correctly and with minimal impact on your home’s interior.
Thermofoil Cabinets
Thermofoil is a flexible vinyl material bonded to a medium-density fiberboard (MDF) core, which offers a sleek appearance that’s perfect for contemporary and modern kitchen designs. This refacing option is durable and resistant to heat, moisture and other common kitchen elements.
Wood Cabinet Doors
Solid wood is a popular choice for cabinet refacing, offering a rich and luxurious aesthetic that complements a variety of styles. It’s a durable material that can be refinished or repainted to extend its lifespan and maintain a high-quality finish.
Laminate Cabinets
Laminate is a cost-effective cabinet refacing option, featuring a high-quality surface that’s resistant to scratches and stains. It’s easy to clean and comes in a variety of colors, finishes and patterns.
Color Trends
If you’re looking to give your kitchen a fresh, updated look, painting or staining the cabinets is an excellent choice. It adds a pristine finish to your cabinetry, protects against wear and tear, and allows you to customize the color to match the rest of your décor. Choose from classic neutrals, eye-catching dramatic hues or the warm and inviting tones of traditional and rustic styles. Adding these finishes can elevate your cabinetry and transform the heart of your home into a truly stunning space.